

 05:17 AM
 akash makwana

Learn a stitch-Knotted chain stitch,a Tutorial
I came across the knotted chain stitch while looking around for a new stitch for outlining. It looked like a good stitch for decorative lines and borders. But different sites had different interpretations for the same stitch . The Wikipedia showed the stitch this way :-
 On the other hand, artsanddesigns had a slightly different version. This stitch is also known by the name of link stitch and I think the above picture justifies the name.
 The arrow points towards the original stitch as shown in Wiki. Click on the photograph for a better view. If the knots are placed slightly far apart or pulled a little tight , we get the other variations.Have a look at the close up below.
Let us see how a knotted chain stitch is made :
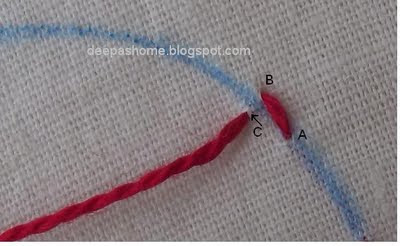
Step 1 : Come up at a point A on the reference line. This stitch is worked from right to left.

Step 2: Insert the needle at a point B above the line and come out at the point C. Make sure that the gap between B and C is not too large. If it is too long, the knot will have two legs jutting out .
Step 3: Pull through to make the base stitch.
Step 4: Now starts the knotting part. Pass the needle through the base stitch from B to C ,without piercing the fabric.

0 ટિપ્પણી(ઓ):
ટિપ્પણી પોસ્ટ કરો